Gather all your supplies including, henna, paper towels, and whatever else
you like to have around.
Be sure the skin is clean and lotion/oil free.
Knead the henna cone WELL. Squeeze out a bit of the henna that may have been exposed to air.
Apply henna directly to the skin either from a cone or a henna applicator
bottle.
You can drape the henna over the skin or touch the skin lightly, whatever
works best for you.
OPTIONAL: Allow henna to dry for about 15 minutes or so and apply a sealer
(details below).
Allow henna to stay on the skin as long as possible. The longer the henna
is left on the skin, the more skin cells are stained creating darker and longer
lasting color. Try to keep the paste on for 4 hours or more.
Remove the paste by gently scraping or picking it off. DO NOT USE WATER to
remove the henna paste. Avoid water for the rest of the day or as long as
possible.
The stain will start off a light orange color and will darken to a
red/brown color over the next few days . You don't have to do anything special
to make this happen. It's part of the wonder that is henna!
You generally have good color 5-10 days and your henna will exfoliate away
completely in 1-3 weeks.
The color and longevity of a henna tattoo depends on a number of factors
including your body temperature, your skin PH level, what part of the body is
tattooed, how long you leave the paste on the skin, how you remove the paste,
and how well you care for your henna stain.
Keep the henna paste on as long as possible (4-8 hours is ideal).
Keep the area as warm as possible.
Do NOT wash the henna paste off with water. Gently scrape the dried henna
off. If you have stubborn henna bits, apply some olive oil on the henna, let is
soften the henna for a couple minutes, then scrape the henna off.
AVOID water on the henna stain as long as possible. Try to avoid water for
the rest of the day.
Avoid chemicals and cleaners, chlorine, salt water, smoothing lotion, and
abrasive soaps.
Optional: If you swim, apply spray bandage sealer over the stain first.
The henna stain will be light orange at first, but will darken
considerably over the next 24-72 hours.
Sealers are used to keep the henna moist and stuck to your skin longer,
thus creating a darker longer lasting henna stain. If your henna is sticking
well on it's own a sealer is not necessary.
Sealers are applied after the henna is dry but before the henna is
cracking and falling off. Sealers can be sprayed on or dabbed on with a cotton
ball. Multiple thin layers are better than one thick layer.
There are a number of different methods you can use for sealing your
henna.
Lemon Sugar Sealer This is my favorite! It doesn't really matter what ratio you use, just mix
some sugar into some lemon juice until it's completely combined. A ratio of 1:1,
1:2, 1:3, or 1:4 of sugar to lemon juice will all work fine.
You can use water or a combination of water and rose water instead of lemon. Really, almost any liquid will work!
Spray Bandage Sealer This is great for large scale designs and for outside use. It's fantastic
to protect henna stains when you swim. It is, however, not natural and should be
use in a well-ventilated area.
Hair Spray This is acceptable in a pinch and works fairly well. It tends to remain sticky.
Elmer's Glue This works great, but is a bit of a pain to put on and takes forever to dry. You have to very
carefully dab it on the paste.
This technique makes use of your body heat to release the henna dye and
can yield amazing results. If you have your mix down and follow good aftercare, a warp is not needed. It's generally more of a special occasion thing, such as bridal henna.
After you have a nicely sealed henna design, you can further enhance your
henna tattoo color by wrapping your design. To wrap a henna design, first make
sure the sealer is completely dry. Two or three thin layers of sealer are better
than one thick layer.
Wrap toilet paper around your henna design. This is
to absorb any sweat or excess moisture that may make your henna design run, so
don't be stingy with it! Use plenty of layers to absorb moisture.
After wrapping in bathroom paper, wrap the henna design with an ace
bandage or a large glove or sock. This will trap your body heat,
keeping the henna warm and moist, and open your pours; the perfect conditions
for optimal henna tattoo stains.
Alternatively, you can use medical tape to cover the henna design, and you don't even need to use the sealer!
Henna is perishable and must be stored properly to leave good color.
Henna Powder Storage Unopened henna powder can be stored in any cool dry place for at least three years. For longer storage, put it in the freezer. Once you open henna powder, expose as little henna as possible to the air and wrap it tightly for storing. Again, store in a cool dry place. Be absolutely sure that no condensation can get into the henna powder if you are putting it in the freezer. .
Henna Paste Storage If using henna paste within a few days, storing the paste in the refrigerator is fine. Anything longer than a few days should be stored in the freezer to keep it fresh. It only takes about 15 minutes to thaw a henna cone. Do not leave henna out at room temperature longer than necessary.
Thawed henna should be kneaded WELL. REALLY WELL. Henna can separate when freezing and thawing so be sure the cone is completely mixed and completely thawed before using it. You can re-freeze thawed henna, but eventually, you will see some issues with texture. .
When Using Henna Paste Outdoors (Festivals and Such) Keep henna in an insulated cooler, lunch box, or thermos. Bring out cones to thaw as you need them.
Henna paste can be unpredictable. I have used henna that was left in the fridge for over 3 weeks and got great color, however I've used henna that was in the fridge for only 4 days and got terrible color. Much of this is due to where the henna is in its dye release process. There is no way to see where exactly the henna is in the process, so be diligent with storing henna paste.
Old henna is great for practicing henna designs, but never use old henna on paying clients or when you want a good henna stain.
Say good-bye to clogged applicator tips and cones! Straining henna will
give you the silkiest smooth henna you have ever used! Best of all this method is
mess free!
Henna Paste (either pre-mixed or the henna you mixed from powder)
Knee High Stocking or Panty Hose (without reinforced toes)
Carrot Bag (for cake decorating)
Tall Cup, Vase, or Drinking Glass
Cut a small opening in the tip of the carrot bag (to release air).
Place the carrot bag tip down inside your cup, folding the top of the bag
over the mouth of the cup so that the carrot bag is acting as a liner for the
cup.
Stretch the stocking over the mouth of the cup (like a drum) so that the
toe is over the cup. If this is the first time you've used the stocking,
pre-stretch the stocking or it will be very difficult to push the henna through.
Carefully glop your mixed henna on the top of the stocking, letting the
toe sink into the cup.
Carefully remove the stocking from the cup, letting the toe of the
stocking fall into the cup while holding the leg of the stocking. This creates a "toe of henna" in
the stocking.
Remove the carrot bag from the cup while keeping the toe of the stocking
inside the carrot bag.
Firmly grip the carrot bag above the "toe of henna" while still holding
the leg of the stocking outside of the bag.
Slowly and firmly pull the stocking through where your hand is grasping
the carrot bag, squeezing the henna out of the stocking and into the carrot bag.
You may need to knead the "toe of henna" to squeeze all of the henna out.
The first time you use your nylon will be the hardest to squeeze the henna
through. After you've used the stocking once or twice it will be much easier to
squeeze the henna through.
This should only take about 5 minutes or so once you've figured it out.
The henna left in the stocking is the henna bits that would have clogged
your applicators! As an added bonus, the carrot bag makes it super easy to fill
henna cones or applicator bottles. As your bottles empty while you use them, you can
continue to refill them using the carrot bag. You may prefer to cut the opening
in the carrot bag a bit larger to fill bottles and cones.
We offer pre-cut cellophane (Mylar) triangles for rolling your own henna
cones! Woo hoo! I know of no one that likes to cut cello triangles!
Place the cellophane triangle printed side down and long edge facing you.
Place a finger on the edge of the long side of the triangle in the middle. If using rectangles place finger about 3/4 of the way down the long side
away from you.
With your free hand, pick up a corner (right or left) and twist it towards
the finger that you have placed in the middle of the long side of the triangle.
Continue to twist creating a cone.
Once you have the cone, hold it with two fingers inside the cone.
If needed, you can twist the cone to adjust its shape until you have a
sharp point at the tip. The key to a good cone is a super pointy tip.
Take a small piece of tape and carefully tape the loose cellophane edge
about an inch or so from the pointy tip.
Use the Scotch brand red plaid transparent tape. The frosted-style tape
(green plaid) will not hold up to freezing or the essential oils used in henna.
Fill the cone 1/2 to 2/3 with henna using a carrot bag or a sandwich
baggie. Don't worry too much if the henna does not reach the bottom of the tip.
You can shake the henna the paste gets down to the tip of the cone, or slightly
cut open the tip to let the excess air to escape allowing the henna to fill the
entire cone.
Fold in both corners of the cone creating a tab at the top of the cone.
Fold or roll down down the tab until it creates a nice tight cone and tape
securely.
Instead of tape you can use a rubber band or binder clips to close cones
to close the henna cones.
Cut the tip of the cone with scissors or nail clippers to make a VERY
small opening; just enough so that a needle could pass through the hole.
Remember, you can also cut the tip a little larger, but once you go too big, you
can't go back!
You can also roll your cones with a small opening in the tip, but this
takes more practice and control. If you are new, try the closed tip roll first.
Any unused henna can be stored in the refrigerator for later use within a
few days. For storage longer than a week, freeze your henna. Make extra henna
cones and freeze them. Thawing individual cones only takes about 15 minutes.
Keep stainless steel metal tips from degrading, clogging, or breaking by
taking good care of them. Jacquard (Jaq or Jac) tips are more susceptible to
damage than ORa henna tips, but with proper care metal henna tips can be used for
years.
Avoid allowing henna to dry in applicator tips. If you can't clean your
tips right away, put them in a cup of clean water until you can clean them
properly. Clean metal henna tips as soon as possible.
Place the metal tips in hot water to soak while you wash the applicator bottles.
Squeeze out any excess henna from bottles and rinse the plastic squeeze bottles completely.
Remove metal tips (one-at-a-time) from hot water and hold them under
running water while using a straight pin to clean any bits of henna on the
inside of the tips. Do this with each tip until it is completely clean and you
can see all the way through the tip and water runs freely through the tip.
Let air dry completely before putting them away. Do not put metal tips or
bottles away wet.
Beachcombers' cosmetic glitter is designed to be applied on top of wet
henna to add sparkle and color to henna designs.
Tips for Applying Glitter on Henna:
Clean the skin with rubbing alcohol before applying henna.
Apply glitter while henna is still wet by poofing or gently shaking
bottle.
Shaking will allow more precision than poofing.
If the design is large, glitter as you go, so the henna doesn't dry before you get to it.
*Optional* Use a bulb syringe to blow excess glitter from the skin.
This works best if you've first cleaned the skin with alcohol, otherwise, the glitter will stick to the natural oils in the skin. All Beachcombers' glitter is cosmetic grade body safe .008 hex glitter made of polyester. Protect your clients and only use cosmetic grade glitter when
applying glitter anywhere on the body.
There is no such thing as white henna. The pictures you see online of an
art called white henna is just any white body art in a henna style design.
Actual henna leaves a stain on the skin and is always a red/brown color. Don't worry, if you like the look of white body art in henna designs, it's easy to do!
There are a number of different ways to create the white henna look.
White Body Paint Use any type of skin-safe body paint and a brush to paint henna designs.
This creates a flat design and allows for interesting brush techniques, but does
not have any shimmer (unless the paint has shimmer). Depending on the type of body paint you use, it can last
until it encounters water up to a couple of days. Do NOT use acrylic or other craft paints. It MUST be a body-safe option.
.
Guilding/Gilding Paste This is an easy-to-make paste that you put into an applicator bottle or a
henna cone and apply in the same way you apply actual henna.
To make white-henna-gilding paste, you'll need a VERY hard hold hair gel
such as Got 2 Be Glued hair glue. You can use this alone or mix in a little
Elmer's glue. Add white mica powder/loose eye shadow. You can also add very fine
body-safe glitter. Put the paste in a cone or applicator bottle and use!
This style can be flat against the skin or slightly raised. The color can
be shimmery depending on what micas and glitters you use. Depending on the gel
and how you care for the design, this can last 1-2 days.
.
Pros-Aide Medical Adhesive Glue with White Mica Powder ***THE BEST OPTION!*** This technique will give you the best white henna
look!
You'll need Pros-Aide cream or liquid (or a combination of the two) and
mica powder. If you don't have access to mica powder (available at most
professional theater or costume shops), you can use any loose eye shadow.
Using Pros-Aide liquid will create a flat design and therefore sticks to
the skin better, lasting longer. The cream will create a raised design. I find
the liquid a bit harder to work with, but you can mix in a little of the cream
and get a product that lies flat and is easy to work with.
Depending on the Pros-Aide glue you use and what part of the body you
apply the art, the design can last 2-6 days. Applying to "bendy" body parts such
as fingers pr wrists will cause the design to fall off much quicker.
You can get a really shimmery design if you use the right mica powder.
Instructions for Pros-Aide "White Henna"
Apply Pros-Aide cream or liquid (or a combination of the two) to the skin using an applicator bottle or a henna cone.
Allow the Pros-Aide to dry COMPLETELY.
Use a soft bristle make-up brush to gently brush the most sparkly white
mica powder you can find!
See? Easy as pie! This is not limited
to white body art. You can use ANY color mica powders you like to create
different looks!
Remember, it's not actually henna and is a surface application only. White
henna body art will not actually stain the skin like real henna.
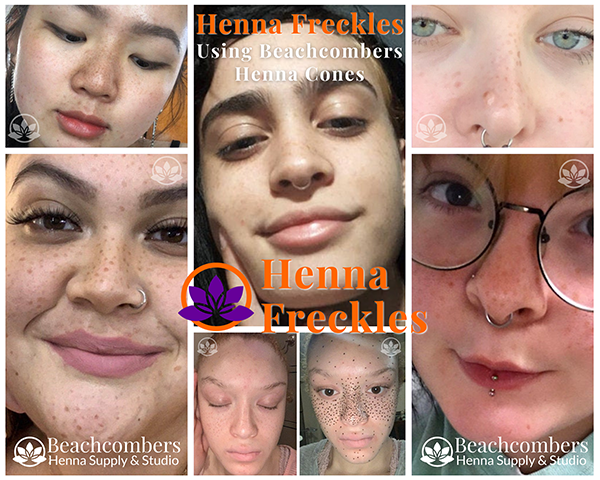
Faux freckles are super cute and super fun! Creating temporary freckles is safe
and easy, but there are some differences between henna freckles and traditional henna
tattoos. The face stains substantially differently than the hands, and you often
want a lighter color for freckles than you do for henna designs elsewhere.
Don't worry! Henna freckles only last 2-5 days. If you don't get it perfect, you
don't have to live with it very long and you can try again.
The pictures here are taken from actual client reviews using our natural henna cones.
Though all our henna (including our premixed henna) is safe to use on the face, the skin on the face is really sensitive, and the eyes are VERY sensitive to essential oils. For facial freckles, I
suggest mixing henna from our ORa henna powder with lavender oil.
Clean the skin well of all oils and lotions, but avoid exfoliation. Exfoliation will not leave enough skin cells on the face for staining and can irritate the skin when applying henna. .
Ready henna. If you are using a cone, knead it well to be sure henna is well mixed. .
Apply henna where you want the freckles on clean dry skin. Be sure to vary the
size of the dots so it looks natural.
.
You'll want to experiment with how long to keep the henna on to get the color you
are looking for. Normally, you scrape henna off the skin and avoid water for the rest
of the day, but for freckles people seem to get better results from gently taking off
the henna with water (NOT soap).
Final color depends on a bunch of factors (how oily your skin is,
where it is in its exfoliation process, your skin tone, your pH level, how warm your
skin is, what type of facial lotions you use, and more).
.
I
suggest starting in 10 or 15 minute increments if you are looking for subtle freckles. If you are looking for darker freckles, I suggest starting with an hour. I have clients that can do 10 minutes
for freckles, and I have clients that have to do 8 hours for henna freckles.
PRO TIP: The chest stains similar to the face on most people, so it's a good place to experiment with timing. .
REMEMBER the color
is LIGHT when you remove the paste. It takes 2 days to darken to full color.
If your henna freckles are too light, leave them on longer and be sure you are
using the maximum safe amount of oil. Don't use water when you remove the henna.
If your freckles are too dark, you can cut back on the essential oils for a
lighter color or decrease the amount of time you leave the henna on the skin.